Utilizando la libreria numpy y matplotlibfrom mpl_toolkits.mplot3d import Axes3Dimport matplotlib.pyplot as plt import numpy as np fig = plt.figure() ax1 = fig.add_subplot(111, projection='3d') xpos = [1,2,3,4,5,6,7,8,9,10,11,12,13,14,15] ypos = [2,3,4,5,1,6,2,1,7,2,3,5,1,3,2] num_elements = len(xpos) zpos = [0,0,0,0,0,0,0,0,0,0,0,0,0,0,0] dx = np.ones(15) dy = np.ones(15) dz = [71,22,36,47,25,69,75,48,99,200,11,12,33,14,85] ax1.bar3d(xpos, ypos, zpos, dx, dy, dz, color='magenta') plt.show()
jueves, 9 de noviembre de 2017
Grafica en 3D
martes, 7 de noviembre de 2017
Figuras en 3D con python
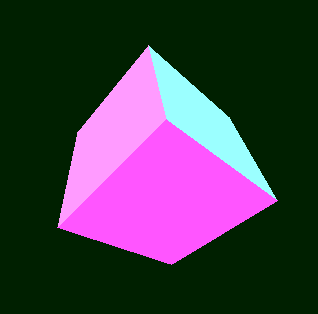
Cubo en 3D

import pygame
from pygame.locals import *
from OpenGL.GLU import *
from OpenGL.GL import *
verticies = (
(1, -1, -1),
(1, 1, -1),
(-1, 1, -1),
(-1, -1, -1),
(1, -1, 1),
(1, 1, 1),
(-1, -1, 1),
(-1, 1, 1)
)
edges = (
(0,1),
(0,3),
(0,4),
(2,1),
(2,3),
(2,7),
(6,3),
(6,4),
(6,7),
(5,1),
(5,4),
(5,7)
)
def Cube():
glBegin(GL_LINES)
for edge in edges:
for vertex in edge:
glVertex3fv(verticies[vertex])
glEnd()
def main():
pygame.init()
display = (800,600)
pygame.display.set_mode(display, DOUBLEBUF|OPENGL)
gluPerspective(45, (display[0]/display[1]), 0.1, 50.0)
glTranslatef(0.0,0.0, -5)
while True:
for event in pygame.event.get():
if event.type == pygame.QUIT:
pygame.quit()
quit()
glRotatef(1, 3, 1, 1)
glClear(GL_COLOR_BUFFER_BIT|GL_DEPTH_BUFFER_BIT)
Cube()
pygame.display.flip()
pygame.time.wait(10)
main()
Triangulo en 3d

import pygame
from pygame.locals import *
from OpenGL.GL import *
from OpenGL.GLU import *
verticies = (
(0,0,1),
(-.5, -.5, 0),
(-.5, .5, 0),
(.5, .5, 0),
(.5, -.5, 0),
)
edges = (
(1,2),
(1,4),
(1,0),
(3,2),
(3,4),
(3,0),
(4,0),
(2,0)
)
def Piramide():
glBegin(GL_LINES)
for edge in edges:
for vertex in edge:
glVertex3fv(verticies[vertex])
glEnd()
def main():
pygame.init()
display = (800,600)
pygame.display.set_mode(display, DOUBLEBUF|OPENGL)
gluPerspective(45, (display[0]/display[1]), 0.1, 50.0)
glTranslatef(0.0,0.0, -5)
while True:
for event in pygame.event.get():
if event.type == pygame.QUIT:
pygame.quit()
quit()
glRotatef(1, 3, 1, 1)
glClear(GL_COLOR_BUFFER_BIT|GL_DEPTH_BUFFER_BIT)
Piramide()
pygame.display.flip()
pygame.time.wait(10)
main()
Cubo de colores en 3d utilizando librerias como pygame
import sys, math, pygame
from operator import itemgetter
class Point3D:
def __init__(self, x=0, y=0, z=0):
self.x, self.y, self.z = float(x), float(y), float(z)
def rotateX(self, angle):
""" Rotates the point around the X axis by the given angle in degrees. """
rad = angle * math.pi / 180
cosa = math.cos(rad)
sina = math.sin(rad)
y = self.y * cosa - self.z * sina
z = self.y * sina + self.z * cosa
return Point3D(self.x, y, z)
def rotateY(self, angle):
""" Rotates the point around the Y axis by the given angle in degrees. """
rad = angle * math.pi / 180
cosa = math.cos(rad)
sina = math.sin(rad)
z = self.z * cosa - self.x * sina
x = self.z * sina + self.x * cosa
return Point3D(x, self.y, z)
def rotateZ(self, angle):
""" Rotates the point around the Z axis by the given angle in degrees. """
rad = angle * math.pi / 180
cosa = math.cos(rad)
sina = math.sin(rad)
x = self.x * cosa - self.y * sina
y = self.x * sina + self.y * cosa
return Point3D(x, y, self.z)
def project(self, win_width, win_height, fov, viewer_distance):
""" Transforms this 3D point to 2D using a perspective projection. """
factor = fov / (viewer_distance + self.z)
x = self.x * factor + win_width / 2
y = -self.y * factor + win_height / 2
return Point3D(x, y, self.z)
class Simulation:
def __init__(self, win_width=640, win_height=480):
pygame.init()
self.screen = pygame.display.set_mode((win_width, win_height))
pygame.display.set_caption("Figura de cubo 3D en python")
self.clock = pygame.time.Clock()
self.vertices = [
Point3D(-1, 1, -1),
Point3D(1, 1, -1),
Point3D(1, -1, -1),
Point3D(-1, -1, -1),
Point3D(-1, 1, 1),
Point3D(1, 1, 1),
Point3D(1, -1, 1),
Point3D(-1, -1, 1)
]
# Define the vertices that compose each of the 6 faces. These numbers are
# indices to the vertices list defined above.
self.faces = [(0, 1, 2, 3), (1, 5, 6, 2), (5, 4, 7, 6), (4, 0, 3, 7), (0, 4, 5, 1), (3, 2, 6, 7)]
# Define colors for each face
self.colors = [(255, 195, 0 ), (218, 247, 166), (199, 0, 57), (0, 128, 0 ), (0, 255, 255), (255, 255, 0)]
self.angle = 0
def run(self):
""" Main Loop """
while 1:
for event in pygame.event.get():
if event.type == pygame.QUIT:
pygame.quit()
sys.exit()
self.clock.tick(50)
self.screen.fill((0, 32, 0))
# It will hold transformed vertices.
t = []
for v in self.vertices:
# Rotate the point around X axis, then around Y axis, and finally around Z axis.
r = v.rotateX(self.angle).rotateY(self.angle).rotateZ(self.angle)
# Transform the point from 3D to 2D
p = r.project(self.screen.get_width(), self.screen.get_height(), 256, 4)
# Put the point in the list of transformed vertices
t.append(p)
# Calculate the average Z values of each face.
avg_z = []
i = 0
for f in self.faces:
z = (t[f[0]].z + t[f[1]].z + t[f[2]].z + t[f[3]].z) / 4.0
avg_z.append([i, z])
i = i + 1
# Draw the faces using the Painter's algorithm:
# Distant faces are drawn before the closer ones.
for tmp in sorted(avg_z, key=itemgetter(1), reverse=True):
face_index = tmp[0]
f = self.faces[face_index]
pointlist = [(t[f[0]].x, t[f[0]].y), (t[f[1]].x, t[f[1]].y),
(t[f[1]].x, t[f[1]].y), (t[f[2]].x, t[f[2]].y),
(t[f[2]].x, t[f[2]].y), (t[f[3]].x, t[f[3]].y),
(t[f[3]].x, t[f[3]].y), (t[f[0]].x, t[f[0]].y)]
pygame.draw.polygon(self.screen, self.colors[face_index], pointlist)
self.angle += 1
pygame.display.flip()
if __name__ == "__main__":
Simulation().run()

import pygame
from pygame.locals import *
from OpenGL.GLU import *
from OpenGL.GL import *
verticies = (
(1, -1, -1),
(1, 1, -1),
(-1, 1, -1),
(-1, -1, -1),
(1, -1, 1),
(1, 1, 1),
(-1, -1, 1),
(-1, 1, 1)
)
edges = (
(0,1),
(0,3),
(0,4),
(2,1),
(2,3),
(2,7),
(6,3),
(6,4),
(6,7),
(5,1),
(5,4),
(5,7)
)
def Cube():
glBegin(GL_LINES)
for edge in edges:
for vertex in edge:
glVertex3fv(verticies[vertex])
glEnd()
def main():
pygame.init()
display = (800,600)
pygame.display.set_mode(display, DOUBLEBUF|OPENGL)
gluPerspective(45, (display[0]/display[1]), 0.1, 50.0)
glTranslatef(0.0,0.0, -5)
while True:
for event in pygame.event.get():
pygame.quit()
quit()
glRotatef(1, 3, 1, 1)
glClear(GL_COLOR_BUFFER_BIT|GL_DEPTH_BUFFER_BIT)
Cube()
pygame.display.flip()
pygame.time.wait(10)
main()
Triangulo en 3d
import pygame
from pygame.locals import *
from OpenGL.GL import *
from OpenGL.GLU import *
verticies = (
(0,0,1),
(-.5, -.5, 0),
(-.5, .5, 0),
(.5, .5, 0),
(.5, -.5, 0),
)
edges = (
(1,2),
(1,4),
(1,0),
(3,2),
(3,4),
(3,0),
(4,0),
(2,0)
)
def Piramide():
glBegin(GL_LINES)
for edge in edges:
for vertex in edge:
glVertex3fv(verticies[vertex])
glEnd()
def main():
pygame.init()
display = (800,600)
pygame.display.set_mode(display, DOUBLEBUF|OPENGL)
gluPerspective(45, (display[0]/display[1]), 0.1, 50.0)
glTranslatef(0.0,0.0, -5)
while True:
for event in pygame.event.get():
if event.type == pygame.QUIT:
pygame.quit()
quit()
glRotatef(1, 3, 1, 1)
glClear(GL_COLOR_BUFFER_BIT|GL_DEPTH_BUFFER_BIT)
Piramide()
pygame.display.flip()
pygame.time.wait(10)
main()
Cubo de colores en 3d utilizando librerias como pygame
import sys, math, pygame
from operator import itemgetter
class Point3D:
def __init__(self, x=0, y=0, z=0):
self.x, self.y, self.z = float(x), float(y), float(z)
def rotateX(self, angle):
""" Rotates the point around the X axis by the given angle in degrees. """
rad = angle * math.pi / 180
cosa = math.cos(rad)
sina = math.sin(rad)
y = self.y * cosa - self.z * sina
z = self.y * sina + self.z * cosa
return Point3D(self.x, y, z)
def rotateY(self, angle):
""" Rotates the point around the Y axis by the given angle in degrees. """
rad = angle * math.pi / 180
cosa = math.cos(rad)
sina = math.sin(rad)
z = self.z * cosa - self.x * sina
x = self.z * sina + self.x * cosa
return Point3D(x, self.y, z)
def rotateZ(self, angle):
""" Rotates the point around the Z axis by the given angle in degrees. """
rad = angle * math.pi / 180
cosa = math.cos(rad)
sina = math.sin(rad)
x = self.x * cosa - self.y * sina
y = self.x * sina + self.y * cosa
return Point3D(x, y, self.z)
def project(self, win_width, win_height, fov, viewer_distance):
""" Transforms this 3D point to 2D using a perspective projection. """
factor = fov / (viewer_distance + self.z)
x = self.x * factor + win_width / 2
y = -self.y * factor + win_height / 2
return Point3D(x, y, self.z)
class Simulation:
def __init__(self, win_width=640, win_height=480):
pygame.init()
self.screen = pygame.display.set_mode((win_width, win_height))
pygame.display.set_caption("Figura de cubo 3D en python")
self.clock = pygame.time.Clock()
self.vertices = [
Point3D(-1, 1, -1),
Point3D(1, 1, -1),
Point3D(1, -1, -1),
Point3D(-1, -1, -1),
Point3D(-1, 1, 1),
Point3D(1, 1, 1),
Point3D(1, -1, 1),
Point3D(-1, -1, 1)
]
# Define the vertices that compose each of the 6 faces. These numbers are
# indices to the vertices list defined above.
self.faces = [(0, 1, 2, 3), (1, 5, 6, 2), (5, 4, 7, 6), (4, 0, 3, 7), (0, 4, 5, 1), (3, 2, 6, 7)]
# Define colors for each face
self.colors = [(255, 195, 0 ), (218, 247, 166), (199, 0, 57), (0, 128, 0 ), (0, 255, 255), (255, 255, 0)]
self.angle = 0
def run(self):
""" Main Loop """
while 1:
for event in pygame.event.get():
if event.type == pygame.QUIT:
pygame.quit()
sys.exit()
self.clock.tick(50)
self.screen.fill((0, 32, 0))
# It will hold transformed vertices.
t = []
for v in self.vertices:
# Rotate the point around X axis, then around Y axis, and finally around Z axis.
r = v.rotateX(self.angle).rotateY(self.angle).rotateZ(self.angle)
# Transform the point from 3D to 2D
p = r.project(self.screen.get_width(), self.screen.get_height(), 256, 4)
# Put the point in the list of transformed vertices
t.append(p)
# Calculate the average Z values of each face.
avg_z = []
i = 0
for f in self.faces:
z = (t[f[0]].z + t[f[1]].z + t[f[2]].z + t[f[3]].z) / 4.0
avg_z.append([i, z])
i = i + 1
# Draw the faces using the Painter's algorithm:
# Distant faces are drawn before the closer ones.
for tmp in sorted(avg_z, key=itemgetter(1), reverse=True):
face_index = tmp[0]
f = self.faces[face_index]
pointlist = [(t[f[0]].x, t[f[0]].y), (t[f[1]].x, t[f[1]].y),
(t[f[1]].x, t[f[1]].y), (t[f[2]].x, t[f[2]].y),
(t[f[2]].x, t[f[2]].y), (t[f[3]].x, t[f[3]].y),
(t[f[3]].x, t[f[3]].y), (t[f[0]].x, t[f[0]].y)]
pygame.draw.polygon(self.screen, self.colors[face_index], pointlist)
self.angle += 1
pygame.display.flip()
if __name__ == "__main__":
Simulation().run()
viernes, 20 de octubre de 2017
Figuras cuadrado octágono y triangulo que piden colores
Octagono
import turtle
import tkSimpleDialog
t = turtle.Turtle()
c1=tkSimpleDialog.askstring(" Color","Contorno")
c2=tkSimpleDialog.askstring("Relleno","Color de figura")
pen_color = c1
fill_color = c2
t.color(c1,c2)
t.begin_fill()
for _ in range(8):
t.fd(100)
t.left(45)
t.end_fill()
turtle.exitonclick()


cuadrado
import turtle
import tkSimpleDialog
t = turtle.Turtle()
c1=tkSimpleDialog.askstring(" Color","Contorno")
c2=tkSimpleDialog.askstring("Relleno","Color de figura")
pen_color = c1
fill_color = c2
t.color(c1,c2)
t.begin_fill()
for _ in range(4):
t.fd(100)
t.left(90)
t.end_fill()
turtle.exitonclick()

Triangulo
import turtle
import tkSimpleDialog
t = turtle.Turtle()
c1=tkSimpleDialog.askstring(" Color","Contorno")
c2=tkSimpleDialog.askstring("Relleno","Color de figura")
pen_color = c1
fill_color = c2
t.color(c1,c2)
t.begin_fill()
for _ in range(3):
t.fd(100)
t.left(120)
t.end_fill()
turtle.exitonclick()

Figuras
Programa1
from turtle import*
import tkSimpleDialog
speed(10)
shape("turtle")
vueltas=30
a=tkSimpleDialog.askstring("Hola", "Color de fondo")
b=tkSimpleDialog.askstring("Hola","Dame color de relleno")
pluma=tkSimpleDialog.askinteger("Numero de pixeles"," grosor Pluma")
bgcolor(a)
pensize(pluma)
fillcolor(b)
begin_fill()
cont=0for i in range(vueltas):
if cont > 14:
clear(); cont=0; i=1; vueltas=1;
begin_fill()
rt(90)
fd(200)
lt(120)
fd(200)
lt(120)
fd(200)
end_fill()
cont= cont+1 print vueltas
exitonclick()
Programa 2
from turtle import*
import tkSimpleDialog
speed(10)
shape("turtle")
c=tkSimpleDialog.askstring("Hola", "Color de fondo")
a=tkSimpleDialog.askstring("Hola","Dame color de relleno")
vueltas=tkSimpleDialog.askinteger("Numero de figuras","figuras")
pluma=tkSimpleDialog.askinteger("Numero de pixeles"," grosor Pluma")
bgcolor(c)
pensize(pluma)
fillcolor(a)
cont=0a=90b=200c=120
for i in range(vueltas):
begin_fill()
rt(90)
fd(200)
lt(120)
fd(200)
lt(120)
fd(200)
end_fill()
cont= cont+1
exitonclick()
Programa 3
from turtle import*
import tkSimpleDialog
speed(10)
shape("turtle")
c=tkSimpleDialog.askstring("Hola", "Color de fondo")
a=tkSimpleDialog.askstring("Hola","Dame color de relleno")
vueltas=tkSimpleDialog.askinteger("Numero de figuras","figuras")
pluma=tkSimpleDialog.askinteger("Numero de pixeles"," grosor Pluma")
bgcolor(c)
pensize(pluma)
fillcolor(a)
cont=0a=90b=200c=120
for i in range(vueltas):
if cont >8:
clear(); cont=0; i=1; vueltas=1;
begin_fill()
rt(90)
fd(200)
lt(120)
fd(200)
lt(120)
fd(200)
end_fill()
cont= cont+1
exitonclick()


import turtle
import tkSimpleDialog
t = turtle.Turtle()
c1=tkSimpleDialog.askstring(" Color","Contorno")
c2=tkSimpleDialog.askstring("Relleno","Color de figura")
pen_color = c1
fill_color = c2
t.color(c1,c2)
t.begin_fill()
for _ in range(8):
t.fd(100)
t.left(45)
t.end_fill()
turtle.exitonclick()

cuadrado
import turtle
import tkSimpleDialog
t = turtle.Turtle()
c1=tkSimpleDialog.askstring(" Color","Contorno")
c2=tkSimpleDialog.askstring("Relleno","Color de figura")
pen_color = c1
fill_color = c2
t.color(c1,c2)
t.begin_fill()
for _ in range(4):
t.fd(100)
t.left(90)
t.end_fill()
turtle.exitonclick()

Triangulo
import turtle
import tkSimpleDialog
t = turtle.Turtle()
c1=tkSimpleDialog.askstring(" Color","Contorno")
c2=tkSimpleDialog.askstring("Relleno","Color de figura")
pen_color = c1
fill_color = c2
t.color(c1,c2)
t.begin_fill()
for _ in range(3):
t.fd(100)
t.left(120)
t.end_fill()
turtle.exitonclick()

Figuras
Programa1
from turtle import*
import tkSimpleDialog
speed(10)
shape("turtle")
vueltas=30
a=tkSimpleDialog.askstring("Hola", "Color de fondo")
b=tkSimpleDialog.askstring("Hola","Dame color de relleno")
pluma=tkSimpleDialog.askinteger("Numero de pixeles"," grosor Pluma")
bgcolor(a)
pensize(pluma)
fillcolor(b)
begin_fill()
cont=0for i in range(vueltas):
if cont > 14:
clear(); cont=0; i=1; vueltas=1;
begin_fill()
rt(90)
fd(200)
lt(120)
fd(200)
lt(120)
fd(200)
end_fill()
cont= cont+1 print vueltas
exitonclick()
Programa 2
from turtle import*
import tkSimpleDialog
speed(10)
shape("turtle")
c=tkSimpleDialog.askstring("Hola", "Color de fondo")
a=tkSimpleDialog.askstring("Hola","Dame color de relleno")
vueltas=tkSimpleDialog.askinteger("Numero de figuras","figuras")
pluma=tkSimpleDialog.askinteger("Numero de pixeles"," grosor Pluma")
bgcolor(c)
pensize(pluma)
fillcolor(a)
cont=0a=90b=200c=120
for i in range(vueltas):
begin_fill()
rt(90)
fd(200)
lt(120)
fd(200)
lt(120)
fd(200)
end_fill()
cont= cont+1
exitonclick()
Programa 3
from turtle import*
import tkSimpleDialog
speed(10)
shape("turtle")
c=tkSimpleDialog.askstring("Hola", "Color de fondo")
a=tkSimpleDialog.askstring("Hola","Dame color de relleno")
vueltas=tkSimpleDialog.askinteger("Numero de figuras","figuras")
pluma=tkSimpleDialog.askinteger("Numero de pixeles"," grosor Pluma")
bgcolor(c)
pensize(pluma)
fillcolor(a)
cont=0a=90b=200c=120
for i in range(vueltas):
if cont >8:
clear(); cont=0; i=1; vueltas=1;
begin_fill()
rt(90)
fd(200)
lt(120)
fd(200)
lt(120)
fd(200)
end_fill()
cont= cont+1
exitonclick()


miércoles, 11 de octubre de 2017
Usando turtle
Barco
from turtle import *
setup (450,400,0,0)
screensize (300,150)
title("Barco")
hideturtle()
pensize(5)
fillcolor("red")
begin_fill()
goto(100,0)
goto(50,100)
goto (0,0)
end_fill()
fillcolor("blue")
begin_fill()
goto(-100,0)
goto(0,-100)
goto(100,-100)
goto(200,0)
goto(100,0)
end_fill()
done()
setup (450,400,0,0)
screensize (300,150)
title("Barco")
hideturtle()
pensize(5)
fillcolor("red")
begin_fill()
goto(100,0)
goto(50,100)
goto (0,0)
end_fill()
fillcolor("blue")
begin_fill()
goto(-100,0)
goto(0,-100)
goto(100,-100)
goto(200,0)
goto(100,0)
end_fill()
done()

from
turtle import *
setup (450,200,0,0)
screensize (300,150)
title("ventana")
hideturtle()
pensize(5)
fillcolor("green")
begin_fill()
goto(100,0)
goto(50,100)
goto (0,0)
end_fill()
fillcolor("brown")
begin_fill()
goto(40,0)
goto(40,-50)
goto(60,-50)
goto (60,0)
end_fill()
done()

FIGURA MARIPOSA
Figura
turtle
from
turtle import *
setup (600,500,0,0)
screensize (100,100)
penup()
pendown()
pensize(5)
fillcolor("magenta")
begin_fill()
goto(40,20)
goto(20,60)
goto(40,100)
goto(80, 120)
goto(40, 160)
goto(80, 220)
goto(60, 240 )
goto(120, 220)
goto(140, 140)
goto(150, 180)
goto(160, 140)
goto(180, 220 )
goto(240, 240 )
goto(220, 220 )
goto(260, 160)
goto(220, 120)
goto(260, 100)
goto(280, 60)
goto(260, 20)
goto(220, 30)
goto(180, 60)
goto(160, 100)
goto(150, 80)
goto(140,100)
goto(120,60)
goto(80,30)
goto(40,20)
end_fill()

lunes, 9 de octubre de 2017
Triggers
Triggers en MySQL
Un disparador es un objeto con
nombre dentro de una base de datos el cual se asocia con una tabla y se activa
cuando ocurre en ésta un evento en particular.
TRIGGERS (Disparadores) EN
MYSQL
Eliminación de un trigger Drop
trigger nombre_disp;
nombre_disp: será el nombre del
trigger.
El disparador queda asociado a
la tabla nombre_tabla. Esta debe ser una tabla permanente, no puede ser una
tabla TEMPORARY ni una vista.
Momento_disp es el momento en que el disparador entra
en acción. Puede ser BEFORE (antes) o AFTER (despues), para indicar que el
disparador se ejecute antes o después que la sentencia que lo activa.
Evento_disp indica la clase de sentencia que
activa al disparador. Puede ser INSERT, UPDATE, o DELETE. Por ejemplo, un
disparador BEFORE para sentencias INSERT podría utilizarse para validar los
valores a insertar.
No puede haber dos
disparadores en una misma tabla que correspondan al mismo momento y sentencia.
Por ejemplo, no se pueden tener dos disparadores BEFORE UPDATE. Pero sí es
posible tener los disparadores BEFORE UPDATE y BEFORE INSERT o BEFORE UPDATE y
AFTER UPDATE.
Sentencia_disp es la sentencia que se ejecuta cuando se activa el disparador (lo que
quiero que sea automático, es un
algoritmo). Si se desean ejecutar múltiples sentencias,
deben colocarse entre BEGIN ... END, el constructor de sentencias compuestas.
Esto además posibilita emplear las mismas sentencias permitidas en
rutinas(procedimientos y funciones) almacenadas.
Ejemplo:
Creamos la base de datos:Proyecto
Creamos una tabla llamada carrera
CREAR LA TABLA BITÁCORA Y CREAR TRIGGER PARA INSETAR, (PARA LA TABLA
CARRERA):


Estructura
de la tabla bitácora


CREAR TRIGGER PARA
BORRAR (PARA LA TABLA CARRERA
Ejemplo de trigger en Mysql
Ejemplo de trigger en Mysql
Practica de
powerpoint
Crear base de datos prueba ,y se pone en uso.
Tabla clientes y
auditoria_clientes


Creación de disparadores o triggers para insertar_auditoria_clientes,para
modificar,y para eliminar.

Introducción de los datos

Ejemplos para crear usuarios
privilegios
Para agregar un nuevo usuario ,
es tan simple como ejecutar la siguiente sentencia:
CREATE USER nombre_de_usuario
IDENTIFIED BY 'clave en texto plano';
Una muy buena práctica es
limitar la conexión de los usuarios por host, para prevenir conexiones desde
hosts no deseados. Para ello, se utiliza:
'nombre_de_usuario'@'host'
Por ejemplo, para crear al
usuario isabella y solo permitir su conexión local, la sentencia sería la
siguiente:
CREATE USER 'isabella'@'localhost' IDENTIFIED BY '123456';
Otorgar permisos
Para otorgar permisos en MySQL,
se deben considerar:
Permiso: El tipo de consultas que se permitirá efectuar al usuario (SELECT,
INSERT, DELETE, UPDATE);
Database: Las bases de datos y/o tablas sobre las cuáles aplicarán dichos
permisos;
Usuario: El o los usuarios a los cuáles serán otorgados los permisos aplicados.
La configuración de permisos se
realizará con la siguiente sentencia:
GRANT
permiso
ON
database
TO usuario;
Por ejemplo, para otorgar todos
los permisos sobre de la base de
datos practica3 al usuario isabella, se
ejecutará:
GRANT ALL privileges on practica3.* TO 'isabella'@'localhost';

Base de datos practica 3

En la imagen de la parte derecha se muestra todas las base de datos,en la parte derecha
solo se le otorgo el permiso de utilizar la bd practica3 al usuario isabella.

46.101.4.154/.../Administración%20de%20usuarios%20en%20MySQL.pdf
Suscribirse a:
Comentarios (Atom)
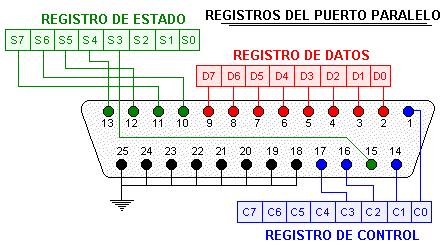
Conclusión del equipo #1: Puertos paralelos Un puerto paralelo es una interfaz entre un ordenador y un periférico. El puerto paralelo ...
-
 from turtle import * def curvemove(): for i in range ( 200 ): right( 1 ) forward( 1 ) color( 'red' , 'pink...
 -
 1.1. Administrador de Base de Datos (DBA) Un administrador de bases de datos (o DBA) tiene la responsabilidad de mantener y operar...
 -
 from Tkinter import * import tkMessageBox import tkSimpleDialog def bloq(): for i in range ( 0 , 9 ): lisb[i].config( st...